Your electric scooter isn’t charging because something is blocking the power flow—most often a faulty charger, loose connection, damaged port, or over-discharged battery. In most cases, the issue can be found and fixed at home with a few careful checks before you ever need a technician.
Key Summary:
- Most electric scooter charging problems come from simple causes such as faulty chargers, loose connections, or over-discharged batteries.
- Checking the outlet, charger light, cable, and charging port in order helps you isolate the issue quickly without opening the scooter.
- A locked Battery Management System (BMS) or blown fuse can block current flow even when everything else appears normal.
- Regular charging, proper storage, and keeping ports clean prevent long-term damage and extend overall battery life.
What to Do When Your Electric Scooter Won’t Charge
When your scooter refuses to charge, start with the simplest possibilities first. Confirm that electricity is actually reaching the scooter, then move inward—charger, cable, port, and finally the battery. Each step helps isolate the cause quickly and prevents unnecessary part replacements.
If you recently stored your scooter for weeks or rode it until the battery completely died, the pack may be over-discharged and temporarily unable to accept current. Leaving it connected to the charger for thirty minutes or more can sometimes allow the Battery Management System (BMS) to reset itself and begin charging again.
Step 1 – Check the Power Source and Charger
Before opening anything, make sure the scooter is getting power at all.
- Plug another device (like a phone charger) into the same outlet to confirm it works.
- Observe the charger indicator light. A steady red or green light usually means the charger is alive; no light or flickering means a fault.
- Try another outlet or a different charger if available.
- Avoid power strips or surge protectors that limit current flow.
If these tests show that power and outlet are fine but the scooter still doesn’t respond, move deeper into the charger check.
Verify Wall Outlet and Charger Light
A working outlet should deliver consistent voltage to the charger. If the charger’s light stays off even on multiple outlets, it’s likely the charger has failed internally. For chargers that glow red while charging and green when full, a permanent green light from the start means no current is flowing to the scooter. Testing with a simple multimeter can confirm output voltage. It should match the figure printed on the label—usually between 36 V and 54 V depending on your model. Anything far below that signals a bad charger.
Try a Different Charger or Socket
Using a known-good charger is the quickest way to rule out this entire component. If the scooter begins charging immediately with another charger, your original unit is faulty and should be replaced with one that matches voltage and amperage ratings exactly. Always stick to manufacturer-approved chargers; mismatched specs can shorten battery life or cause overheating.
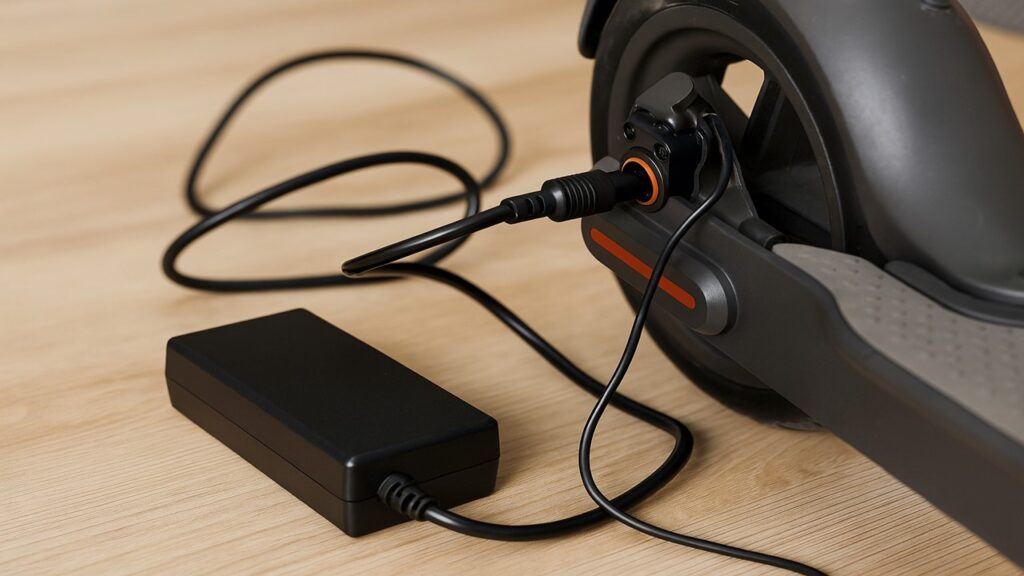
Step 2 – Inspect the Charging Cable and Connector
If the charger itself works, the next weak link is the cable and connector that carry current into the scooter.
- Check the cable from end to end for cuts, frays, or melted spots.
- Ensure the plug fits firmly into both the charger and scooter.
- Replace any cable that looks crushed or kinked.
Even a slightly bent pin or loose connector can interrupt power transfer and make the scooter seem dead.
Look for Physical Damage
Examine the entire charging cord under good light. Twisted insulation or a shiny, brittle surface means the wire has overheated in the past. Wiggle the connector gently—if you see sparking, hear crackling, or feel warmth, stop using it. Damaged insulation can cause short circuits that harm the battery or controller. A replacement cable is inexpensive compared to repairing a burnt port.
Replace Damaged or Loose Cables
If plugging the charger in feels sloppy or the connector wiggles excessively, replace it. A secure mechanical fit ensures solid electrical contact. When buying a new cable, match both the connector type and the current rating listed on the charger. A lower-rated cable can overheat under load. After replacing, observe the charger light again; if it now changes color and the scooter indicators turn on, the issue was the connector all along.
Step 3 – Examine the Charging Port
When both charger and cable check out, attention turns to the scooter’s charging port—the point most exposed to dirt and moisture.
- Inspect the port for dust, debris, or corrosion.
- Clean gently with compressed air or a dry soft brush.
- Never spray liquids directly inside.
- Check that the port isn’t loose or moving when you insert the plug.
A poor physical connection here can stop charging even when every other part works.
Clean the Port Carefully
Over time, fine dust or pocket lint can settle inside the port and block contact between pins. Shine a small flashlight into the opening. If you see buildup, blow it out with compressed air or use a soft bristle brush. Avoid metal tools that could bend pins or short the terminals. Once clean, reconnect the charger firmly and check if the indicator light changes to show current flow.
Check for Rust or Corrosion
Moisture exposure, especially after rainy rides, can oxidize the metal contacts inside the port. A green or white film on the pins is a clear sign of corrosion. Light oxidation can be removed with a cotton swab lightly moistened with isopropyl alcohol. Let the port dry completely before charging again. If corrosion is severe or the pins are missing or bent, replacing the port assembly—usually a simple unscrew-and-swap task—restores proper contact and safe charging.
Step 4 – Test the Battery and BMS
If your charger and port are working fine but the scooter still doesn’t respond, the issue often lies within the battery or its Battery Management System (BMS). Both play a key role in storing and regulating power.
- Look for swelling, leakage, or unusual smells coming from the battery.
- Leave the charger connected for at least 30 minutes to see if the battery revives.
- Avoid opening the battery casing unless you have experience with electronics.
- If your scooter has a removable battery, test it in another compatible scooter if possible.
Once these basic checks are done, move on to understand how an over-discharged battery or BMS lockout might be stopping the charge flow.
Detect an Over-Discharged Battery
When a scooter has been unused for weeks or drained completely, its voltage can drop below the safe threshold required to start charging. The charger may light up green immediately and deliver no current. In this case, leave the charger connected continuously for at least half an hour. Some BMS systems slowly reawaken the cells once minimal voltage is restored. If it still doesn’t respond after an hour, the battery could be permanently damaged or need professional balancing.
Reset the Battery Management System
The BMS prevents overcharging, deep discharge, and overheating. However, after a long idle period or heavy drain, it may lock the battery to prevent damage. To reset it, disconnect the charger, turn off the scooter, and hold the power button for about ten seconds before reconnecting. Some models include a small reset switch near the battery casing. A successful reset is usually followed by the charging indicator turning red or orange again. If nothing changes, the BMS may need service or replacement by a technician.
Step 5 – Check for a Blown Fuse or Tripped Breaker
A small fuse often sits between the charger port and battery to protect against power surges. If this fuse blows, electricity cannot reach the battery even when the charger is fine. Open the fuse holder and inspect the wire inside; if it appears broken or blackened, replace it with one of the same rating. Never substitute a higher amp fuse, as it could damage internal wiring. After replacement, plug the charger in again and look for a steady charging light to confirm the fix.
Step 6 – Reset or Reboot the Scooter
Sometimes, a simple reset resolves charging and power glitches caused by software bugs or temporary communication faults between components. Start by disconnecting the charger and turning off the scooter completely. Hold down the power button for 10–15 seconds, release it, and wait another few seconds before turning the scooter on again. Reconnect the charger to see if the indicator light changes.
Certain brands like Segway, Ninebot, and Xiaomi include small reset buttons inside the deck or near the charging port. If your scooter has one, press it with a paperclip for a few seconds while the scooter is off. This clears any memory errors that might prevent charging. Rebooting can also help the BMS and controller resynchronize their voltage readings, allowing normal charging to resume.
Step 7 – When to Seek Professional Repair
If your scooter still doesn’t charge after trying all the above steps, the issue may involve internal components such as the controller, wiring harness, or damaged BMS circuitry. These parts require specialized tools and testing to diagnose safely. Attempting to open or rewire them without experience can void warranties or cause electric shock.
Bring the scooter to an authorized service center or reputable repair shop. Professional technicians can test individual cells, inspect the control board, and safely replace damaged modules. Typical diagnostic fees range from $25 to $50, which is worthwhile compared to replacing major components unnecessarily.
Step 8 – Prevent Future Charging Problems
A few simple habits can dramatically extend your scooter’s battery life and prevent charging failures.
- Avoid letting the battery run to zero; recharge when it drops near 20%.
- Store the scooter with about half charge if unused for weeks.
- Keep the scooter in a cool, dry environment.
- Always use the original charger provided by the manufacturer.
Once these basics become routine, focus on smart charging and safe storage practices that improve long-term reliability.
Read more:
Smart Charging Habits
Plug in your scooter after each ride instead of waiting for the battery to drain completely. Shallow discharge cycles are healthier for lithium-ion packs. Unplug the charger after it turns green to avoid unnecessary heat buildup. If your model supports it, use an automatic shutoff charger for extra protection.
Safe Storage & Weather Tips
Moisture and extreme heat are major enemies of battery health. Avoid charging or storing the scooter right after riding through rain. Wipe the port dry and wait at least an hour before plugging it in. During long-term storage, keep the battery between 40–60% charge and recharge it every few weeks to prevent over-discharge.
Step 9 – Electric Scooter Charging Troubleshooting Table
If you’re unsure which step applies, use this quick guide to identify your problem.
| Symptom | Possible Cause | Recommended Fix | Tool Needed |
| Charger light off | Dead outlet or faulty charger | Try another outlet or charger | Multimeter |
| Charger light green, scooter dead | Over-discharged battery or BMS lockout | Leave on charge 30–60 minutes, reset BMS | None |
| Charging port feels loose | Bent pins or damaged socket | Clean or replace charging port | Screwdriver |
| Fuse blown | Power surge or short circuit | Replace with same rating fuse | Small screwdriver |
| Battery swollen or leaking | Cell damage | Replace battery immediately | None |
| Scooter turns off during charge | Controller or wiring issue | Seek professional repair | Multimeter |
Final Words
Most electric scooter charging problems start with small issues—loose plugs, dusty ports, or batteries left drained for too long. By following each diagnostic step methodically, you can fix the majority of charging failures without professional help. Regular cleaning, moderate charging, and careful storage not only keep your scooter ready for daily rides but also ensure the battery lasts far beyond its warranty life.
FAQs
Why is my electric scooter not charging even though the charger light is on?
This usually happens when the battery is over-discharged or the BMS has locked itself to protect the cells. Leave it plugged in for 30–60 minutes to see if the system resets, or try another verified charger to confirm the issue.
How do I know if my electric scooter charger is faulty?
If the indicator light doesn’t turn on or the charger feels unusually hot, it’s likely defective. Testing the output voltage with a multimeter can confirm whether it’s delivering the proper voltage printed on its label.
Can a blown fuse stop my scooter from charging?
Yes. A blown fuse breaks the connection between the charger and battery, preventing any current from flowing. Replace it with the same rated fuse to restore power safely.
Is it safe to charge my scooter overnight?
It’s better to avoid overnight charging. Most scooters reach full charge within 3–6 hours, and leaving them plugged in too long can generate excess heat that slowly degrades the battery.
What’s the best way to maintain my battery health?
Keep the charge level between 20% and 80%, store the scooter in a cool, dry place, and recharge at least once every few weeks if it’s unused. These habits prevent deep discharge and extend battery lifespan.

Max Volt is an electric scooter and e-bike enthusiast who rides daily and knows the nuts and bolts of every model. With years of hands-on repair experience and real-world testing, Max shares practical reviews, maintenance tips, and buyer guides to help riders choose the right gear with confidence. His mission is to make electric commuting safer, smarter, and more enjoyable for everyone.